The question I get from homeowners more than any other: “Could I do this myself?” My honest answer is always the same: it depends on how much you value your weekends, your marriage, and your willingness to redo a project three times before it’s right. Most of them book the job after that. But when it comes to deck inspection, repair, and full rebuilds, that question shifts entirely — because unlike a pergola or a patio, a failing deck isn’t just a cosmetic problem, it’s a liability one, and the difference between “I can fix this myself” and “this needs a licensed contractor with a permit” is sometimes the difference between a weekend project and a collapsed structure. What I’m sharing here comes from years of walking job sites, pulling apart other people’s mistakes, and occasionally inheriting the aftermath of a well-intentioned DIY gone wrong — so take this for what it is: trade experience, not sales copy.
I’m sharing all of it — the ugly parts and the good parts — because if you’re a homeowner staring at a deck that looks “fine on top” but hasn’t been properly inspected in years, I want you to hear my story before you end up living it yourself.
How a Routine Home Sale Turned Into a Structural Crisis
We were selling our house. It was supposed to be a smooth, exciting process. The deck out back was one of the features I was proudest of — twelve years old, pressure-treated lumber, a great footprint for outdoor entertaining. I’d sealed it a few times over the years and replaced a couple of boards that had gone soft. I figured it was in decent shape.
The buyer’s inspector did not agree.
The report came back with six pages of findings related to the deck alone. The ledger board — the critical piece that connects the deck to the house — had been improperly flashed, allowing water to seep behind it for years. Three of the four footings were showing signs of shifting. The joist hangers were original and had corroded badly. And several of the decking boards I thought were “mostly okay” had soft rot in the center that wasn’t visible from above.
The buyer’s agent sent over a repair request that made me feel sick. We were either going to lose the sale or rebuild the deck almost from scratch. After a painful week of negotiations, we agreed to a full rebuild as a condition of closing.
What the Deck Inspection Repair Rebuild Process Actually Looked Like
Once I accepted the situation, I threw myself into understanding every step of what needed to happen. Here’s what I learned — and what I’d tell anyone facing a similar repair or rebuild project.
Start With a True Structural Assessment
The biggest mistake homeowners make is treating a deck inspection like a cosmetic review. The surface boards are almost never the real problem. You need someone who will check the ledger connection, the post bases, the footings, the beam sizing, and the joist hangers. Ask specifically about flashing. Improper or missing flashing at the ledger is one of the leading causes of deck failure, and it’s completely invisible until water damage has already done serious harm.
If you’re hiring a contractor for the rebuild, ask them to walk you through their assessment before any demo starts. A trustworthy contractor will want you to understand exactly what they’re replacing and why.
Demo First, Then Evaluate What Can Stay
In my case, we kept the existing concrete footings after they were re-evaluated and confirmed to be structurally sound — just slightly offset. Everything else came off. The contractor installed new post bases, new pressure-treated posts, new beams, new joists with properly rated joist hangers, and all-new flashing at the ledger. It was essentially a new deck on existing concrete.
The decking surface was where I got to make some decisions of my own, and that’s where things actually started to feel exciting rather than terrible.
Getting the Decking Right the Second Time
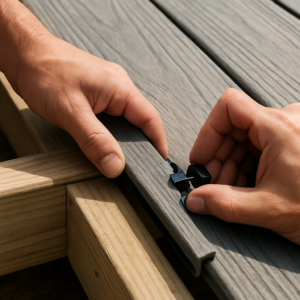
One thing I insisted on doing alongside the contractor crew was helping with the decking installation. It kept my costs down a little and, honestly, I needed to feel connected to this project after being blindsided by it. The most tedious part of laying new decking boards is maintaining consistent spacing — gaps that are too small trap debris and moisture, gaps that are too large look sloppy and can be a tripping hazard.
The Spacer Set That Saved My Solo Rebuild — and My Sanity
When you’re rebuilding a deck alone, maintaining consistent gaps between boards is the difference between a professional-looking rebuild and one that shows every mistake. I learned this the hard way, and that’s where having a multi-size spacer set made all the difference.
What works
- Multiple thickness options in a single set eliminate the constant tool switching — I went from swapping improvised shims to grabbing the right spacer in one motion.
- Works across composite, hardwood, and pressure-treated lumber without binding, so you’re not locked into one deck material for your remaining projects.
- The ABS construction won’t absorb water or swell like wooden spacers do, keeping your gaps perfectly consistent from day one through your first season.
What doesn’t
- The smaller spacers can slip out if you’re not deliberate about removing fasteners — I had to develop a rhythm of bracing with one hand before pulling screws.
- At full deck scale, you’ll find yourself constantly reaching for the same two or three sizes, so the complete set feels partially redundant for most residential projects.
I nearly ditched the spacer approach halfway through and went back to eyeballing gaps — that’s how frustrating the early learning curve felt — but once I committed to the system, my board lines came out arrow-straight. If you’re doing a major deck rebuild solo, grab the Multi-Size ABS Deck Board Spacers before your first fastener goes in.
Multi-Size ABS Deck Board Spacers
I stopped improvising shims and kept consistent gaps through my entire first season.
Check Price on Amazon →This post contains affiliate links. As an Amazon Associate, I earn from qualifying purchases at no extra cost to you.