When I’m evaluating a landscaping plan, I ask one question the client never expects: “What does this look like in five years?” Anybody can make a yard look great on install day. The properties that still look great half a decade later are the ones where someone thought about maintenance, drainage, and material choice before the first shovel went in the ground. Outdoor kitchens are where I see homeowners make the most expensive mistakes — not because they spent too much, but because they spent in the wrong order, on the wrong things, without understanding how surfaces, heat exposure, and weather cycling interact over time. What follows is how I’d approach a $3,000 outdoor kitchen build if a client handed me that number and asked me to make it last — what I’d cut without hesitation, and what I’d fight to keep in the budget.
I’m sharing this story because I think a lot of people planning a backyard kitchen go in with either too much confidence or not enough information. I had both problems at once. But here’s the good news: we finished the kitchen. It looks incredible. Dave and I are back to grilling together every other weekend, and the whole thing came in just under $3,000 after I returned a few expensive mistakes. If you’re planning your own build, let me save you the headaches — and maybe a friendship or two.
Where Things Went Wrong (And What I Should Have Done First)
The fight with Dave started over the grill. I had already ordered a freestanding cart-style grill before we even drew up a frame design. Dave pointed out — correctly, as it turns out — that a freestanding grill doesn’t integrate cleanly into an island build. You end up with awkward gaps, no countertop continuity, and a setup that looks cobbled together. I didn’t want to hear it because I’d already paid for shipping.
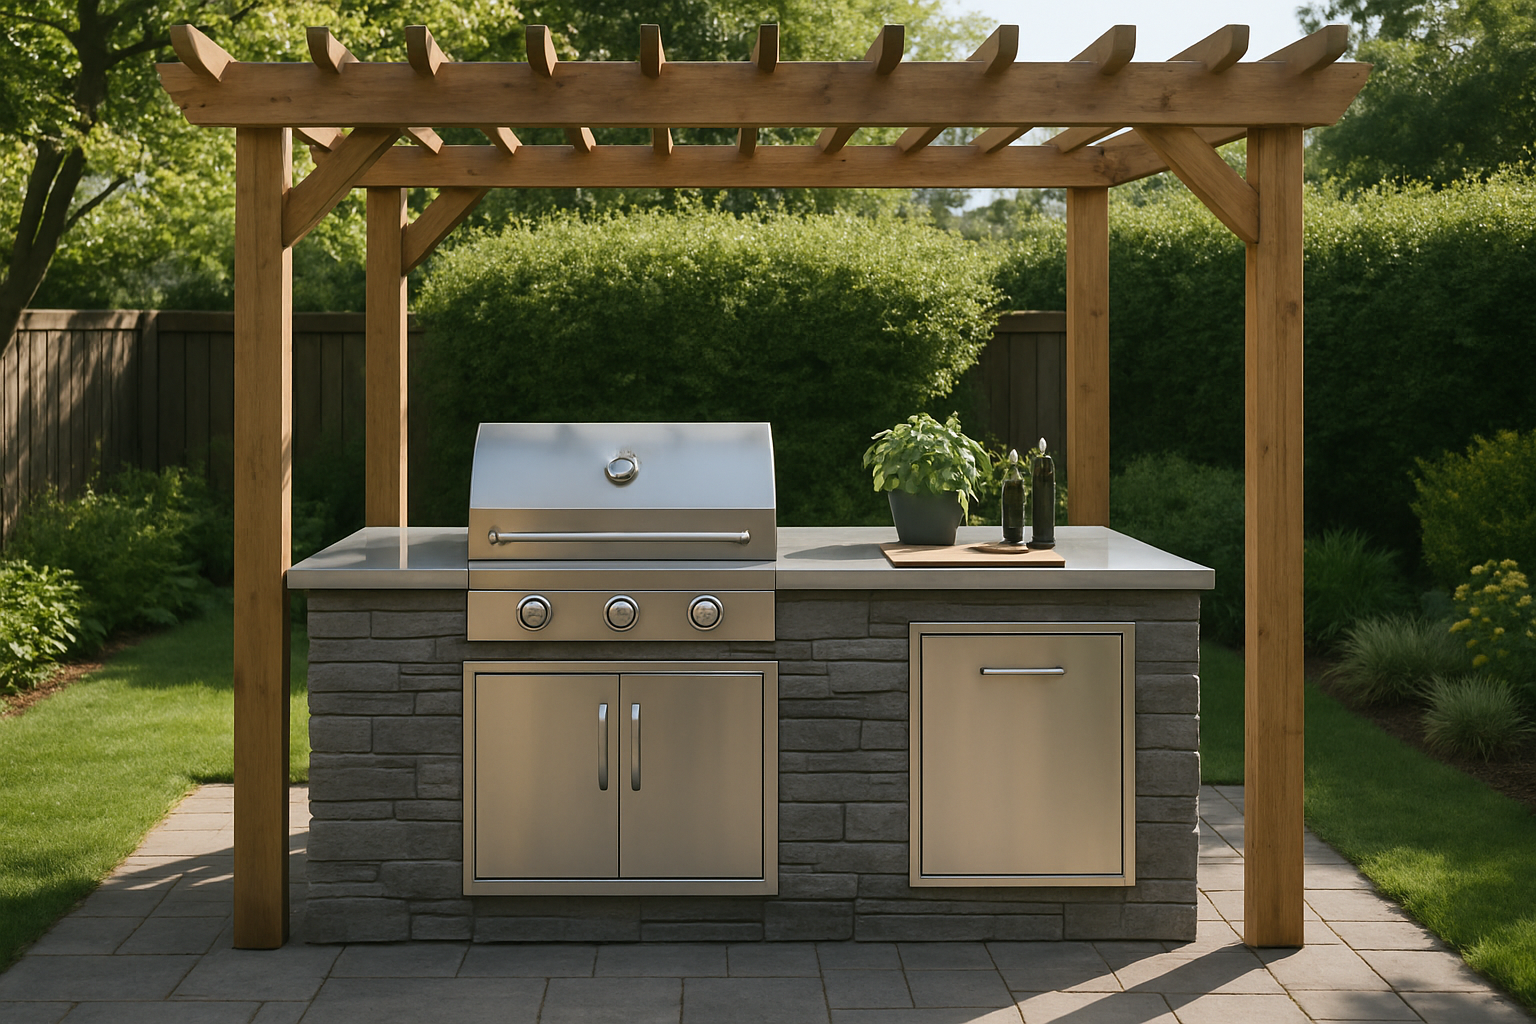
We returned the grill. I lost $80 in restocking fees and shipping. That was my first expensive lesson: plan your grill head first, then build the frame around it. A built-in grill head is the centerpiece of everything — the frame dimensions, the countertop cutout, the access doors — all of it flows from that one decision.
The second mistake was overcomplicating the materials. I priced out natural stone countertops, cedar cabinetry, and a built-in refrigerator. That’s how $4,200 turns into $9,000 before you pour a single bag of concrete. I had to get ruthless about what I actually needed versus what looked great in a Pinterest board.
My Outdoor Kitchen Budget Build: What I Cut
Once I reset my expectations and my spreadsheet, I made some hard cuts that I now consider the smartest decisions of the whole project.
What Got Crossed Off the List
- Natural stone countertops — Swapped for a poured concrete countertop I mixed and finished myself. Saved roughly $600 and honestly looks better than I expected.
- Built-in refrigerator — A well-insulated outdoor cooler handles my needs 95% of the time. I can always add a mini fridge later.
- Outdoor sink with plumbing — Running a water line required a permit in my county and a licensed plumber. That alone was a $1,200 quote. Cut it entirely.
- Side burner add-on — I opted for a grill with a rear infrared burner built in instead of a separate side burner unit. More heat options, less cost, less counter space used.
- Custom tile work — Used stucco over cement board on the exterior of the frame instead. Painted it to match my patio wall. Clean, durable, and a fraction of the price.
What I Refused to Cut
- A quality built-in grill head with real BTU output
- Proper stainless steel storage — weather-resistant and lockable
- A concrete block frame (not wood) for longevity and fire safety
- A dedicated propane drawer with ventilation
What I Used: My Recommended Products
After the initial grill fiasco, I did real research before buying anything else. Here’s what made the final cut and why each piece earned its place in the build.
The Grill That Survived My First Winter Without Rusting Through
A cheap grill head will corrode from the inside out before year two, forcing a total rebuild that costs more than doing it right the first time. The grill is the centerpiece of your outdoor kitchen — and the one component that takes direct heat, moisture, and temperature swings every single day.
What works
- Stainless steel construction actually holds up to freeze-thaw cycles without the interior rusting into powder.
- The burner design drains grease and moisture downward instead of pooling in seams — I’ve watched cheaper models fail here in year one.
- Five burners give you real cooking zones (not just “hot” and “less hot”), which means you’re not replacing it when your family’s cooking style changes.
What doesn’t
- It’s the single largest line item in a $3K build — you’ll have less flexibility for cabinetry and concrete finishes elsewhere.
- Professional installation is strongly recommended if your island frame isn’t perfectly level; a cheap DIY install can create water traps that defeat the whole purpose.
I almost went with a three-burner discount model on my first build to save $600, then watched a neighbor’s identical setup rot through after a single Pennsylvania winter. That moment of hesitation disappeared the second I looked at grill replacements five years later — they cost more than the entire island. Get the Spire Premium 5 Burner Built-In Gas Grill Island Head and stop second-guessing yourself.
Spire Premium 5 Burner Built-In Gas Grill Island Head
Five zones let you cook differently without replacing the whole thing when your needs change.
Check Price on Amazon →This post contains affiliate links. As an Amazon Associate, I earn from qualifying purchases at no extra cost to you.