This post contains affiliate links. As an Amazon Associate, I earn from qualifying purchases.
The question I get from homeowners more than any other: “Could I do this myself?” My honest answer is always the same: it depends on how much you value your weekends, your marriage, and your willingness to redo a project three times before it’s right. Most of them book the job after that. But when it comes to paver joints specifically — why they fail, why pavers shift and sink, and what actually holds a patio together long-term — I’ll give that knowledge away for free, because I’ve watched too many decent installs fall apart not from bad pavers or a bad base, but from one overlooked step that most contractors either rush through or skip entirely.
When a Dream Patio Becomes a Nightmare
The warning signs started small. A paver here or there that rocked underfoot. A joint that seemed a little wider than I remembered. I told myself it was normal settling. By month ten, I noticed a low spot near the fire pit area. By month twelve, the patio looked like a jigsaw puzzle that had been bumped off the table. Water was finding its way toward the foundation, and I had guests coming for a Fourth of July cookout. I called the original contractor. He said it was my fault for not sealing it. I called a second opinion. He said the base was fine — the real problem was the joint sand. It had washed out. Every rainstorm for over a year had slowly, quietly eroded the sand between every single paver, and once that support disappeared, everything started to move.
That conversation changed everything for me. I went down a research rabbit hole, talked to two hardscape professionals, and eventually fixed the patio myself — for less than $200 in materials. Here’s exactly what I learned and what I used.
Why Regular Sand Is the Hidden Culprit Behind Shifting Pavers
Most standard patio installations use basic kiln-dried or mason’s sand to fill the joints between pavers. It’s cheap, it’s easy to apply, and it looks fine when the job is done. The problem is that it has zero binding ability. Rain washes it out slowly over time. Ants tunnel through it. Weeds take root in it. Wind carries away the surface layer. Before you know it, those joints are hollow, and hollow joints mean there’s nothing locking your pavers in place. Each one becomes an independent floating tile with no lateral support.
The fix — the one nobody told me about when I first had my patio installed — is polymeric sand. Polymeric sand contains silica particles plus a blend of polymers that, when activated with water, bind together and harden into a firm, flexible joint. It resists washout, resists insects, inhibits weed growth, and most importantly, it locks your pavers together so they stop moving. It’s not a new product, but it’s still surprisingly underused on residential installations, often because it costs a little more upfront and contractors want to keep bids competitive.
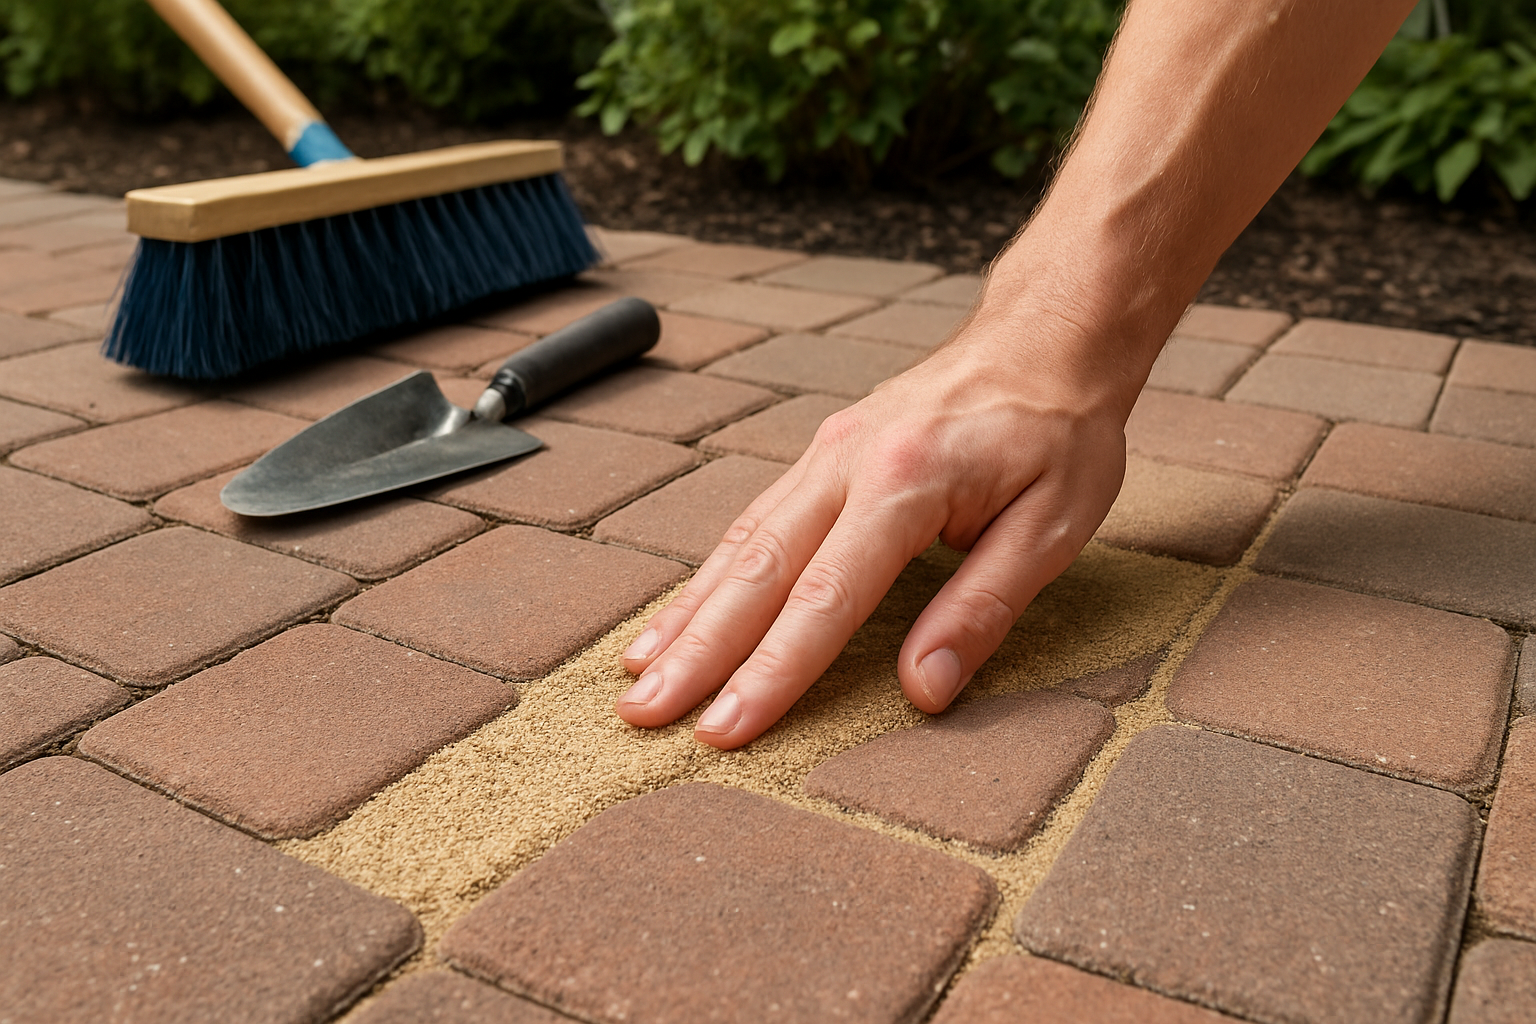
How to Properly Apply Polymeric Sand (What I Did Step by Step)
Before you do anything, make sure you address any pavers that have already shifted or sunk. Reset them properly — pull them up, re-level the base material beneath them, and lay them back down. Don’t skip this step. Polymeric sand will lock everything in place exactly as it sits, so you want it sitting right before you apply.
Once your pavers are level and properly positioned, here’s the process I followed:
- Clean out the old joints completely. I used a stiff-bristled push broom and a leaf blower to remove as much of the old sand and debris as possible. For stubborn areas, a flathead screwdriver worked well to loosen compacted material.
- Make sure the surface is completely dry. Polymeric sand needs to be applied to a dry surface. I waited two full days after a rain before starting.
- Pour and spread the polymeric sand. I poured it in sections and used a broom to sweep it into the joints at multiple angles, making sure every gap was fully packed.
- Compact with a plate compactor or hand tamper. This step is critical. Compaction drives the sand deep into the joints so there are no air pockets.
- Sweep off excess carefully. Any polymeric sand left sitting on the paver surface when you add water will haze. Blow off the surface thoroughly with a leaf blower set to a low setting.
- Activate with water. Use a gentle mist or shower setting on your hose — never a hard stream. Wet the joints slowly and evenly. Let it cure for 24 hours before any foot traffic.
My Recommended Products for Stabilizing Paver Joints
Not all polymeric sands are created equal, and after doing a lot of research and trying a couple of different options myself, here are the ones I’d recommend depending on your situation.
Best Overall: DOMINATOR Polymeric Sand with Ceramic Flex Technology
This is the product I wish I had used from day one. DOMINATOR’s ceramic flex technology sets it apart — it cures firm but retains just enough flexibility to handle freeze-thaw cycles without cracking. It comes in Titanium Gray and Gray Beige, handles joints from 1/8″ up to 4″, and delivers genuinely professional-grade results. I used the Titanium Gray on my own patio and the color match was spot on with my charcoal pavers.
Great Mid-Range Option: Rhino Power Bond Plus
If you’re working with tighter joints or a smaller area, Rhino Power Bond Plus in Slate Gray is a solid performer. It’s rated for joints up to 2 inches and goes on smoothly. I used this on a smaller walkway repair and was happy with how it set up. Good choice for detail work or narrow joints.
Budget-Friendly Pick: Paver Joint Sand, 40 LBS
For those working with a tighter budget on a larger area, this 40 lb stabilizing joint sand in Tan/Beige offers solid coverage and a warm neutral tone that works well with natural-colored pavers. It’s a step above basic sand and still gives you meaningful joint stabilization at a lower cost per pound.