This post contains affiliate links. As an Amazon Associate, I earn from qualifying purchases at no extra cost to you.
If I could give every new vegetable gardener just one piece of advice, it would be this: skip the in-ground bed and build a raised garden bed first. I’ve grown food both ways for over fifteen years, and the difference in productivity, ease, and sheer enjoyment is not even close. A raised garden bed gives you complete control over your soil, your drainage, and your growing environment from day one. Whether you’re working with rocky ground, heavy clay, or a tiny backyard, a well-built raised bed levels the playing field immediately. In this guide, I’ll walk you through everything — why raised beds work, what to build them from, how to construct one, and exactly how to fill it so your plants thrive from the first season.
Why Raised Garden Beds Work Better
The case for raised garden beds comes down to one thing: control. When you grow in the ground, you’re at the mercy of whatever soil happens to be there, whatever weeds already have roots established, and whatever drainage conditions exist naturally. A raised bed changes all of that.
- Better soil control and drainage: You fill a raised bed with exactly the mix your vegetables need. No compaction, no clay, no poor drainage. Roots penetrate easily, water moves through at the right pace, and plants grow visibly faster because of it.
- Far fewer weeds: Because you’re starting with fresh, weed-free soil above ground level, the weed pressure in a raised bed is dramatically lower than in-ground gardening. You’ll still get a few wind-blown seeds, but they’re easy to pull from loose, fluffy soil.
- Easier on your body: A taller raised bed means less bending, less kneeling, and far less strain on your back and knees. If mobility is a concern, this alone makes raised beds worth every penny.
- Extended growing season: Soil in a raised bed warms up two to three weeks faster than in-ground soil in spring. That means earlier planting dates, longer harvests, and more food from the same space each year.
- Pest protection: Ground-level pests like voles, moles, and some ground-dwelling insects have a much harder time reaching your crops. Add a layer of hardware cloth on the bottom and you’ve built a serious barrier against burrowing animals.
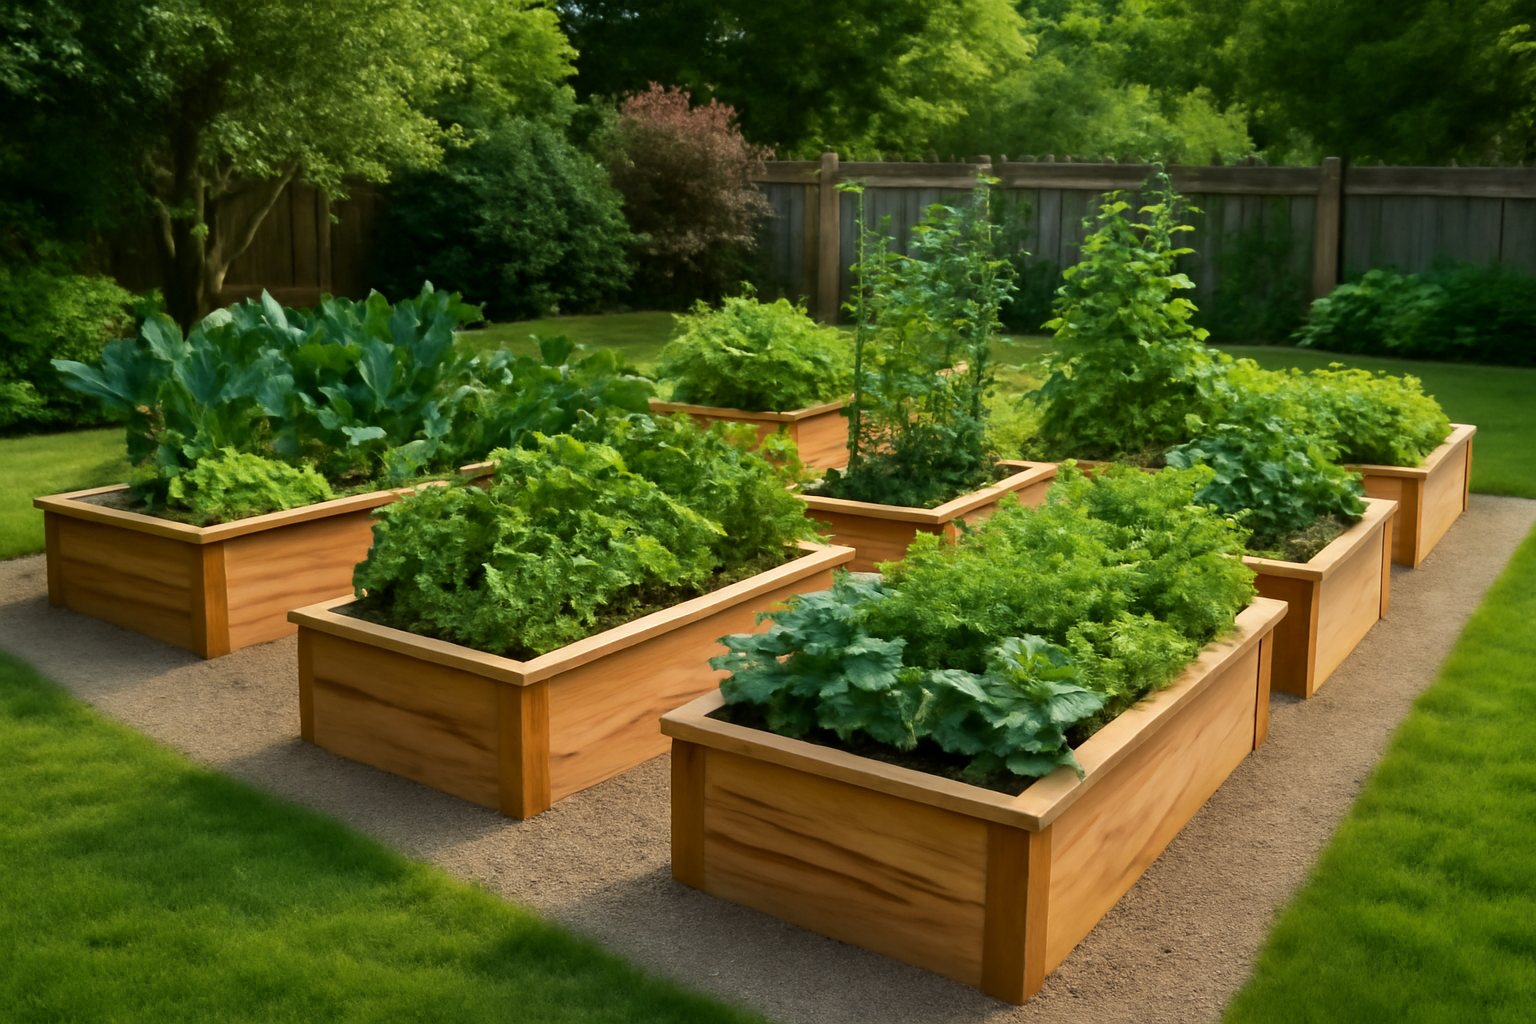
Best Materials for Raised Garden Beds
One of the most common questions I get is what to build a raised garden bed out of. The honest answer is that the best material depends on your budget, your aesthetic preferences, and how long you want it to last. Here’s how the main options stack up.
Cedar
Cedar is my personal favorite and the material I recommend most often. It’s naturally rot-resistant thanks to the oils in the wood, it looks beautiful, and a well-built cedar raised bed will easily last 10 to 15 years without any treatment at all. It costs more than pine upfront, but the longevity makes it the better long-term value.
If you want the convenience of a ready-to-assemble cedar option without breaking out the saw, the Infinite Cedar Select Cedar Raised Garden Bed (4′ x 8′ x 17.5″ H) is the one I keep coming back to for recommendations. It’s made from select-grade cedar, comes in a classic 4×8 footprint that I’ll explain is nearly the perfect size, and sits at a solid 17.5 inches tall — deep enough for root vegetables and most herbs without needing any supplemental depth. The joinery is clean, the wood is thick, and it assembles without special tools. I’ve seen these last well over a decade with nothing more than an occasional seasonal cleaning.
Pine
Untreated pine is the most affordable wood option. It works fine and will last you three to five years in most climates before it starts breaking down. For a beginner who wants to try raised bed gardening before committing to a permanent structure, pine is a perfectly reasonable starting point.
Corrugated Metal
Corrugated galvanized steel beds have exploded in popularity over the last few years, and for good reason. They have a clean, modern look, they’re extremely durable, and they essentially last forever. The metal does heat up faster than wood, which can actually extend your growing season even further, though you’ll want to make sure your soil doesn’t dry out too quickly in hot climates.
Concrete Blocks
Standard concrete blocks (CMUs) are the cheapest permanent raised bed option available. You simply stack them without mortar, which also makes it easy to adjust or expand later. They hold heat well, they never rot, and they’re extremely sturdy. Not the prettiest option, but incredibly functional.
What to Avoid
- Pressure-treated lumber: Modern pressure-treated wood uses copper-based compounds rather than the arsenic-based treatments of decades past, so it’s considerably safer. That said, I personally don’t use it near food crops because I don’t see the need when better options exist.
- Railroad ties: These are saturated with creosote, a known carcinogen. Keep them far away from any area where you’re growing food.
For gardeners who want a raised garden bed but don’t have a dedicated ground-level space — think patios, decks, or balconies — an elevated planter is a fantastic solution. The Maple99 Raised Garden Bed with Legs 48x24x30 – Natural Cedar Wood Elevated Planter Box is what I set up on my patio for herbs and compact vegetables, and it’s been a workhorse. The 30-inch standing height means zero bending over, which is a genuine game-changer for daily tending and harvesting. It holds up to 200 pounds and comes with a bed liner already included to protect the wood and retain moisture. The natural cedar looks sharp outdoors and weathers gracefully. If you’re tight on space or want a raised bed you can use on a hard surface, this is one of the most practical raised garden bed ideas I’ve come across.
How to Build a Raised Garden Bed
Building a raised bed from scratch is a satisfying weekend project, and it doesn’t require advanced carpentry skills. Here’s how I approach it every time.
Size and Dimensions
The most important sizing rule is the 4-foot maximum width. You should be able to reach the center of your bed comfortably from either side without stepping into it — because the moment you step into a raised bed, you’re compacting the soil and defeating part of the purpose. Four feet wide lets most adults reach the center from both sides without stretching. Length is flexible — 4×4, 4×8, and 4×12 are all common and functional. For depth, aim for 12 to 18 inches. Twelve inches works for most vegetables, but 18 inches gives you room for deeper-rooted crops like carrots, tomatoes, and squash.
Simple Corner Post Construction
For a DIY build, the simplest and most durable design uses 2×6 or 2×8 boards for the sides and 4×4 posts at the corners. Cut your side boards to length, clamp them to the corner posts, pre-drill to avoid splitting, and fasten with exterior-grade screws. Stack two boards high for a 12-inch depth or three for an 18-inch depth. That’s genuinely it. No fancy joinery needed.
Site Prep and Pest Protection
Level the ground where your bed will sit — even a slight slope can cause uneven watering. Before you set the frame in place, lay down a layer of hardware cloth (1/4-inch mesh) across the entire bottom and staple or fold it up the inside edges a few inches. This creates a physical barrier against gophers and voles that will absolutely try to tunnel up into your bed if given the chance. Don’t skip this step if you live anywhere these animals are present. Landscape fabric on the bottom is not a substitute — it restricts drainage and root growth for deep-rooted plants.
How to Fill a Raised Bed (The Soil Mix That Works)
The soil mix is where a raised bed garden either succeeds or struggles, and it’s one of the decisions I see beginners get wrong most often. Here’s what actually works.
The Proven Mix
My go-to formula for a productive raised bed is 60% quality topsoil, 30% compost, and 10% perlite or vermiculite. The topsoil gives you bulk and structure, the compost delivers nutrients and beneficial microbiology, and the perlite or vermiculite keeps the mix from compacting and improves drainage. This ratio has never let me down across a dozen different beds over the years.
For the compost and amendment portion of your mix, the Espoma Organic Raised Bed Mix is a product I’ve used repeatedly and trust completely. It’s an all-natural, OMRI-listed organic mix specifically formulated for raised bed gardening — not a generic potting soil repurposed for the job. What sets it apart is that it already contains mycorrhizal fungi, which helps plant roots establish faster and access nutrients more efficiently. It’s rich, dark, and has excellent moisture retention without becoming waterlogged. I use it as the compost portion of my blend or mix it with quality topsoil to fill a new bed. If you want to simplify your soil situation without compromising on results, this is a dependable choice.
For smaller raised beds or container-style planters where you need a lightweight, well-draining mix, Miracle-Gro Potting Mix is a practical option I reach for when I need reliable performance in a hurry. It feeds plants for up to six months, which is genuinely useful in the first season when you’re still building the biology of a new bed. I’d blend it with topsoil and compost rather than using it straight — pure potting mix dries out fast and gets expensive at scale — but as a component or a standalone fill for an elevated planter like the Maple99, it performs well.
The Hugelkultur Method for Deep Beds
If you’re building a bed that’s 18 inches or deeper, filling the entire volume with purchased soil gets expensive fast. The hugelkultur method solves this beautifully. Simply lay logs, large branches, and woody debris in the bottom third of your bed before adding soil. As the wood breaks down over time, it retains moisture, feeds soil biology, and slowly releases nutrients. You end up with a self-improving bed that gets better with each passing year. Use untreated wood only — hardwoods like oak and maple break down into excellent organic matter.
What Not to Do
Don’t fill a large raised bed with pure potting mix. It’s far too expensive to do at volume, it dries out extremely quickly in warm weather, and it lacks the mineral content that vegetables need over a full growing season. Save potting mix for containers and use the topsoil-compost-perlite blend for your raised beds.
Ready to Start Growing?
A raised garden bed truly is the single best investment you can make in a home vegetable garden. Whether you build one from cedar boards this weekend, assemble a ready-made kit, or set up an elevated planter on your patio, you’ll be amazed at how much easier and more productive gardening becomes once you control your own soil. Start with one bed, get comfortable with it, and I promise you’ll be planning your next one before the first season is over. These are some of my favorite raised garden bed ideas for any skill level or space — and all of them work. Now go dig in.